
When you first decide to get rid of cable, you tend to gravitate toward set-top indoor antennas. There’s a good reason for this—you aren’t quite sure that you are going to commit to a cable-free life. You don’t want to climb up on your roof. You don’t want to squirm through that little hole in the attic. But learning to install a TV antenna in your attic is crucial to having a great, cable-free experience in your own home.
Eventually, cable-nixers want to get an even better reception than the one you’re getting from the set-top box. You’re going to want more channels and less of those black glitches that flash across your screen as your antenna signal gets weak. In this article, I’m going to show you how to install a TV antenna in your attic.
Just how much better is the reception from a set-top box to an attic antenna? Everyone’s situation is different, but I had a Terk HDTVa indoor antenna in my basement which performed very well. It averaged around 65% antenna strength for the major networks and 55% for my local PBS affiliate. I am averaging 95% antenna strength with the new antenna for the major networks and 80% antenna strength for the local PBS affiliate. When I relied on the Terk HDTVa antenna, I had to consciously point it to different transmitters for ABC and PBS to get the best glitch-free reception. Now, with my new attic antenna it stays pointed in the same direction and is 99% glitch free for all my channels.
Overview
The nice thing about installing an antenna in your attic is it isn’t rocket science. The hardest part is getting the coax cable to your television. The easiest part is picking the antenna that is right for you. Read my post on choosing the best antenna for your situation.
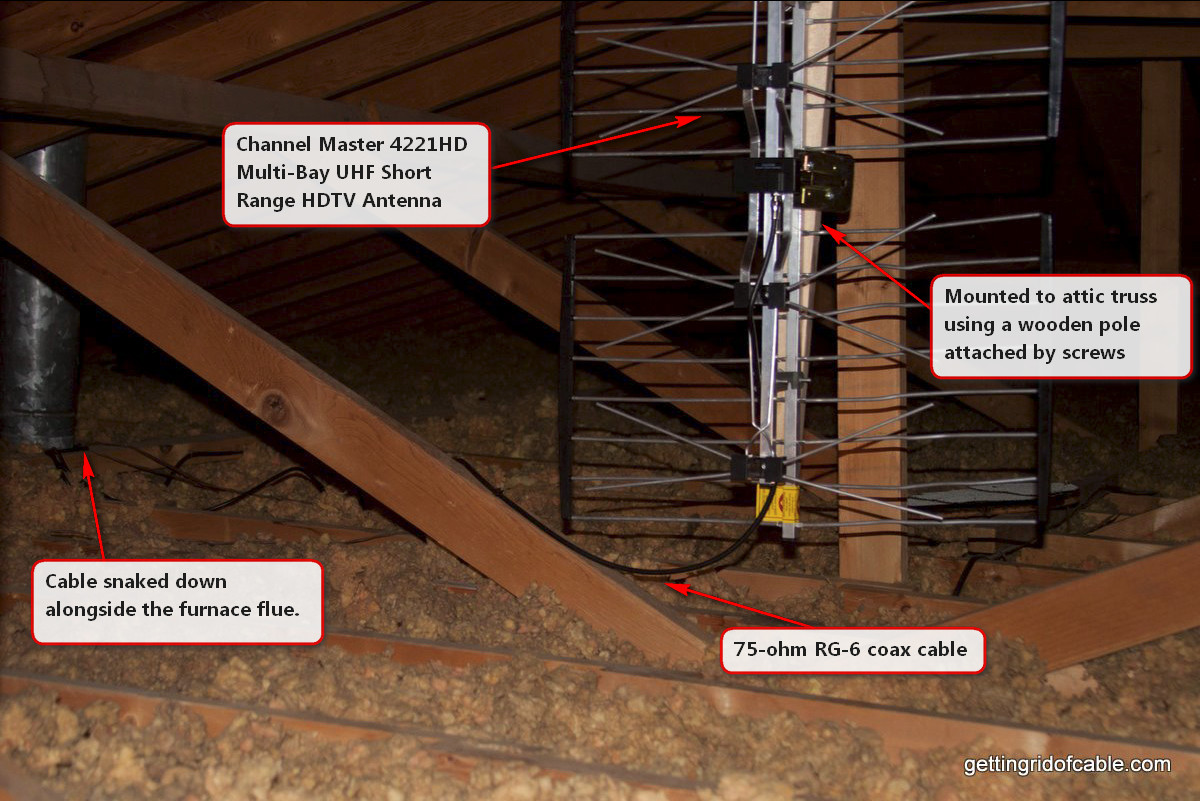
See the picture to the right to see how I wired it up.

Tools Needed to install a TV antenna in your attic
In addition to the antenna, I needed the following items:
- Spool of RG-6 Coax Cable. Do NOT use RG-59. It’s too lossy and more prone to damage. The 50 foot roll was sufficient for me, but your situation may be different. If you’re going to run the cable through a hot HVAC duct, look for Plenum cable—it is heat resistant and doesn’t give off poisonous fumes if it does burn. You can buy it for 61 cents a foot here.
- Cable tools: You can buy separately or get them all in a kit here.
o Coaxial Cable Cutter and Stripper. Used to cut your RG-6 cable to the proper size and prepare it for attaching an F-connector.
o F-Connectors. Used to attach to the ends of the cable—these are the fittings that screw into the antenna and the TV/DVR/Converter Box.
o Compression Crimper. Used to attach your F-connectors to the cable when it is cut to the right size.
- Plastic coax cable clips. Like these.
- Drill with bits that work on aluminum. Nothing too fancy, just something to drill holes. I have one like this.
- Screwdriver to attach the antenna to something in the attic.
- Flashlight or better yet, a headlamp. Even better yet, a hard hat with a headlamp.
Disclaimer
The best way to run cable from your attic is through the walls. If you can do this, by all means do it.
I wasn’t up to the task because I needed the cable run to the basement from the attic. I used a cable installer trick of running it alongside the furnace flue. This made my job much easier, but you should check with your local code to make sure you can do the same thing. Also, use plenum Coax cable which is heat resistant and doesn’t give off poisonous fumes if it burns.
Step 1: Get a Good TV antenna to install in your attic
The antenna I’m using is the Channel Master 4221HD, but I now recommend the Channel Master 4228HD. This antenna is good if you live in a city with multiple transmitters—because it is good at picking up signal from different directions. Basically it’s not as directional as some of the more popular indoor/outdoor antennas.
Step 2: Get Into the Attic
To install a TV antenna in your attic, you have to go into the attic.
My attic access door is fairly small. So small that the antenna was too big to fit through! Not a problem, though. I just took the plastic ends of one side of the antenna and shoved it through the access door. It bent quite a bit, but I was able to straighten the tines back out once I got up in the attic with it.
Attic Safety
There are a lot of attic safety tips out there, but I won’t go into a lot of them in this article. Just make sure you wear appropriate clothing (long sleeved shirt tucked into gloves, with long pants). Wear a respirator, too, because that fiberglass dust makes you cough! Safety glasses are nice, too.
Don’t step on anything except trusses and joists. It helps to bring up a board, like a 2 x 8, to place across the joists. If you see any weird stuff, like vermiculite insulation, old wiring, or signs of animals, don’t touch or mess with it. You should consider having an expert assess that stuff.
Step 3: Attach the Antenna to Something
You’re going to need to attach the antenna to something up there. You don’t want your antenna to shift positions. You also want it to be free from obstructions. Most antennas designed for outdoor or attic installations come with some mounting hardware. You may still need to visit your local hardware store, or buy some online.
I ended up buying the Channel Master 3078 Roof/Attic Mount Antenna Mount Kit, and then I attached it to a small wood pole. The pole, in turn, was attached to a truss in the attic using screws.
See the picture to the below to see what I mean.
Step 4: Run the Coax Cable
You need to get the signal from your antenna to your TV, DVR, or converter box. You can do this many different ways, ideally you can snake the cable through your walls to the destination. If that won’t work, you can drill a hole through your attic wall and drop the cable down on the outside of the house. Another option, which I wouldn’t recommend you do unless you know what you are doing—is to snake the coax down alongside the furnace flue.
Caveat on cable type
If you decide to go this route, you’re supposed to use plenum coax—because it has a higher temperature tolerance and if it does burn it doesn’t give off poisonous fumes. You can buy it by the foot here or on Amazon here.
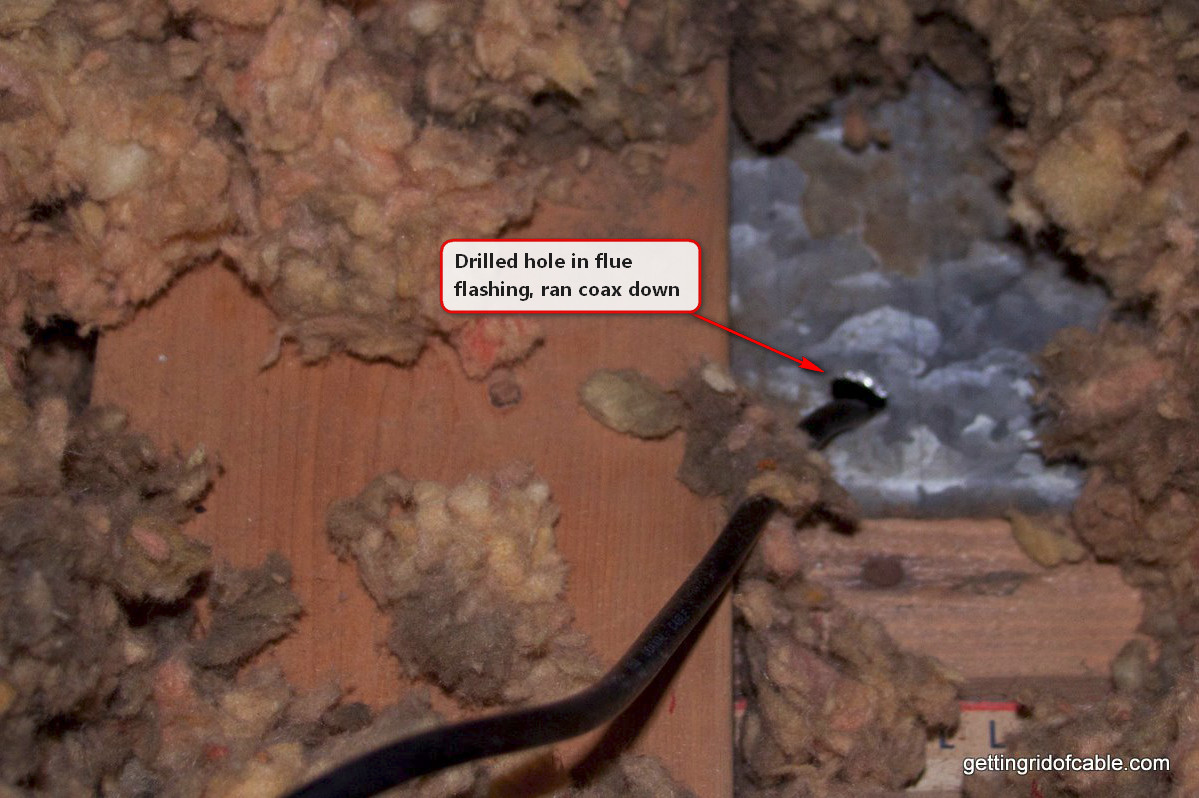
To run the coax cable through the furnace flue I just drilled a hole through the flashing trim that runs around the flue. The hole needed to be wide enough for the cable to fit through. This took me about 5 minutes because my drill bit was dull. Make sure you use a sharp drill bit and the proper RPMs for aluminum. Aluminum is very soft and tends to stick to your drill bit.
Running the cable through the flue
Once the hole was made, I pushed most of the cable through the hole. I left about 3 extra feet of cable in the attic and then fastened it to attic rafters using plastic coax cable clips.
After getting out of the attic I made my way to the basement where I drilled a similar hole in the flashing trim around the furnace flue. Unfortunately, I could not retrieve the cable from the basement, so I had to knock a hole in the wall on the first floor. I made the hole about 8 inches square. From there I was able to snake the cable through the flue flashing. I also used a couple cable clips to pin the coax down from the flue—it’s hotter near the basement because that’s where the furnace is.

I had to later patch the drywall back up, which isn’t too hard.
The cable was now dangling in the basement, and there was plenty there. I measured enough to run to the cable splitter that comes from the cable company—so I could run antenna signal to every room in the house. Another bonus is the cable splitter is on the outside of the house, very close to where the coax cable dropped from the basement ceiling.
After running the cable to the outside, I made sure to cut off just what I needed and then using my strip and crimp tools I attached an “F†type connector and connected it to the input of the splitter.
Step 5: Enjoy Free TV
After everything was installed I ran to my TV to see if it worked. It did! And the signal was incredibly strong. I got about 50% signal boost in the attic compared to the set-top Terk HDTVa indoor antenna.
The great thing about the is that while it is a directional antenna, it has a wide enough range that it can pick up all my city’s channels (UHF and VHF) without being rotated.
Yes, I could have put the antenna on the roof and enjoyed an even stronger signal—one layer of asphalt shingles reduce TV signal by 50%—the signal I get is strong enough. And no need to rotate the antenna. My TiVo happily records shows over the air and they are ready to watch at my convenience. For free.
Caveats
Please know that your situation is most likely different than mine. You should first try to drop cable through the walls of your house—not alongside the furnace flue. If you do happen to snake cable down alongside the flue, make sure you buy plenum 75-ohm RG6 coax. I hope I’ve been able to show you how to successfully install a TV antenna in your attic.
Trackbacks/Pingbacks